

Proto-typing: Northseeker
- Gordon Greenroom
- Jun 19, 2023
- 6 min read


The Rainmaker is iconic but it’s also quite a committed backpack, with a tonne of features, organisation and customisability. So, when people ask for a simple day pack, we used to recommend the Bookslayer, but for some reason people often shrugged it off.
In hindsight, maybe it had to do with the way we marketed it, or maybe it was just too simple of a pack. So I started thinking about something that could potentially sit between those products—something that was basically a simpler, maybe even paired down version of the Rainmaker. In fact, I was even toying with the idea of calling it the Rainmaker Lite, but after I gave it more thought I realised that it wasn’t right because it was going to be an entirely different pack.
WORKING AS INTENDED

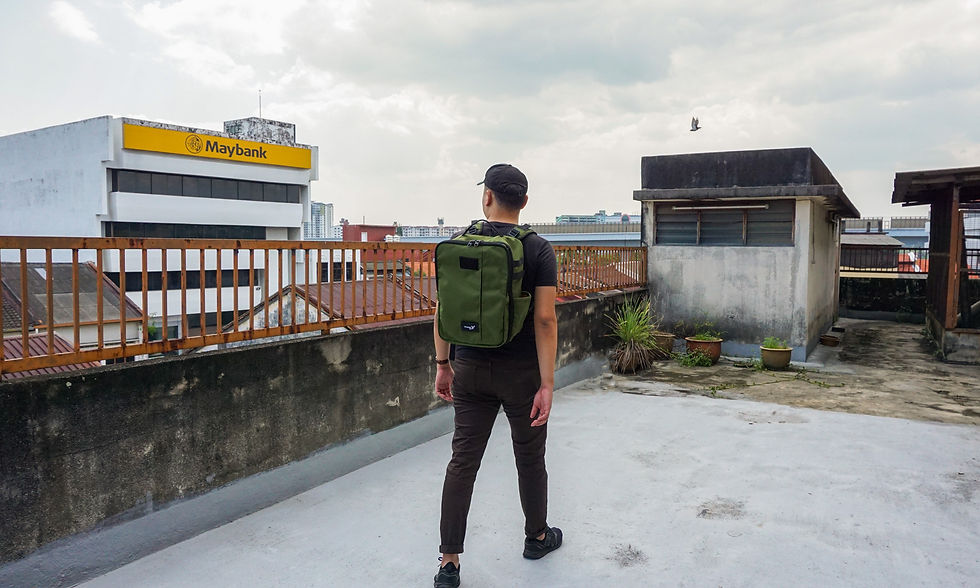
I’ve had the design for the Northseeker in my head for over a year now. I knew I wanted it to be a two compartment, clamshell design. I knew I wanted something simple to build so we could also keep the cost and weight down, and pass those savings onto our customers.

But I didn’t want to limit its appeal by building a bag with features that were too rigid or a bag that was too simple. You see, a Northseeker is someone who’s looking for their true purpose, whatever that purpose may be. So, I wanted to give people the flexibility to kit it out and adapt it to whatever task they needed the bag for.
The solution? Equip the bag with a robust multi-pouch attachment webbing system so its users could decide what they wanted to do with the backpack by themselves. You’ll find this webbing on either side of the pack and even on the bottom.

Attach more pouches to carry more stuff, add more organisation, heck, you can even lash firewood to the bottom of the pack the next time you’re out camping. Much like Hal Jordan, the possibilities of what you can do are only limited by your imagination.
Early iterations included webbing on the inside of the main compartment too, but after seeing the initial prototype, I realised that it was too deep to be meaningful. So I pivoted, replacing that with a second admin section in the rear to complement the document sleeve.

But then, we ran into an issue with accessing those compartments, so I added a quick access zipper to the top of the pack. This lets you quickly grab things from the main compartment and the rear admin section without needing to open up the entire clamshell. I even made it large enough that you could pull your whole laptop out through this zipper if you wanted to.

And it worked, which is great. Only, it might have worked a little bit too well. In our early testing we found ourselves using this rear admin section for quick access items like keys and wallets more often than the front admin panel.
Which led me to a brand new headache: should I just…put the D-ring at the back? I was torn. On one hand, making the rear panel the “main” admin section would likely affect laptop carry, especially if you were hanging your keys there. But, at the same time, it just makes sense for you to stash important quick access items like your keys and wallets at the back—for both safety and security reasons.
In the end, I decided to err on the side of caution and leave the D-ring in the front compartment because I had another, more pressing issue.
SHAPING THE PATH
It was quite tricky to get the shape and look of the Northseeker just right. The first problem I had to tackle was what to do with the front. Leaving it blank would have been too boring, but going full tactical would make it visually indistinguishable from the Rainmaker.
Inspired by our very own Roninsparrow, I slapped a zipper down the front. That gave access to a slim front pocket, turning the 2-compartment pack I had initially envisioned into a 2.5 compartment pack.
But I immediately ran into an issue when the pack was loaded up. Unlike the Roninsparrow which had its own dedicated space, this compartment didn’t, so anything we put in there would make the front bulge up and that made the rain flaps on the zipper look really ugly.
Back to the drawing board it was.

In the end, I was forced to go with a straight zipper—something I was trying to avoid because I didn’t think it would look nice. But now, seeing it on the finished product, I’ve actually grown to like it.
However, I still had the issue of the shape of the pack. Prototype #1 was just way too stocky. It looked like a cube when worn on the back and I just wasn’t in love with the idea. So I tried making it taller and slimmer, which helped the ratio a little bit.


The only problem was, now the pack would wobble when loaded up, especially if you put weight in the front compartment. It looked like the Northseeker’s main compartment was simply too deep.
I didn’t want to give up the capacity. Prototype #2 was around 28 litres, which I thought was a good size, but the team was insistent that it was too big for a pack that you were supposed to carry daily.

A compromise then: we’ll do two packs, a 25 litre large and a 20 litre medium, but the size shavings would only come from the depth of the pack.
While I was glad to have settled on that, there was one last issue I had to take care of.
WATER BOTTLE-GATE

L-R: Northseeker medium, Prototype #3 (with stretchy Sidepockets)
I always envisioned the Northseeker with a set of Sidepockets. Great for water bottles, tripods and other tall items you didn’t want to store inside the pack. We’ve offered it on the Genesis and it’s even an optional add-on for the W?ldcard Rainmaker.
But, I haven’t done a Sidepocket with a clamshell pack like this before. Even on the custom Rainmaker, the clamshell upgrade is not compatible with the Sidepocket add-on.
That was partly why I initially designed the Northseeker the way I did. Two compartments would mean more depth on the main compartment for a nice usable Sidepocket.

Early prototypes had big solid Cordura pockets that would hold up to a 1.5 litre bottle in the large size and a 850 ml to 1 litre bottle in the medium pack. But, after the tweaks we made to slim down the bag, the pockets would also have to shrink.
The current iterations of the medium and large pack would still fit up to a very usable 500ml bottle and 1 litre bottle respectively, but I wondered if there was a better way to do pockets.
Enter the stretchy Sidepocket.


Not only would it be able to sit flush—unlike the “hard” Cordura Sidepockets that gave the pack a bit of a jetpack look—but there was also the potential to squeeze in more in a pinch. And the early prototype we pushed with this pocket looked mighty sleek.
I’ve always preferred the solid Cordura pocket for the stability you get when carrying bottles. Of course, the trade-off is the bulge and lack of stretchability, but, with a gusset at the bottom, it will give a better fit to anything with a third dimension.
It also keeps the colour of the pack nice and consistent, compared to the stretchy Sidepocket’s black that will obviously match with some colours better than others.

After testing both out, it was a tough choice. Although the stretchy Sidepockets are highly stretchable, there’s really only so far a stretchy fabric can stretch. After a bunch of test fits, I just wasn’t confident in the pocket’s ability to last the way I knew a Cordura side pocket would be able to last.
So I put it to a vote and in the end, we decided on the Cordura pocket. Capacity stays the same, colour stays consistent, and its durability has been tried and tested. That being said, we're putting the stretchy Sidepocket in the KIV bucket for now---it's a great idea, we just need to figure out how to make it work.
Finally, after so much tweaking, iteration and headache, it was finally coming together. The Northseeker was finally looking right. It was about damn time.
I’m looking forward to seeing what you do with your Northseeker, especially since it’s also debuting with our brand new backpack straps—also built with flexibility and function in mind.
—Pat


Comments